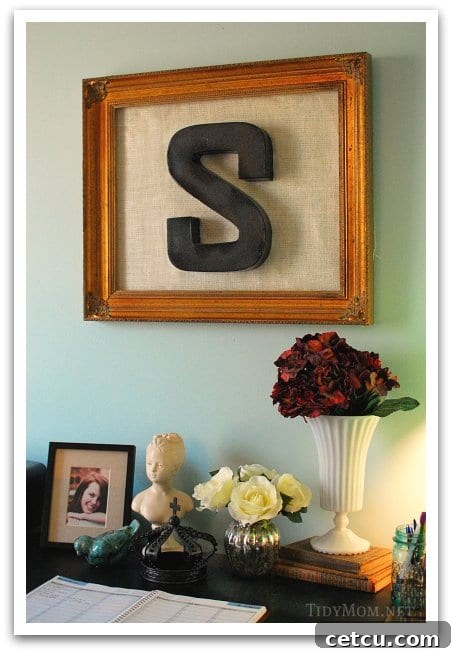
Unleash your creativity and elevate your home decor on a budget! Discover how a simple old frame, a scrap of burlap, a paper mache letter, and a splash of paint can transform into captivating wall art, adding a unique, personalized touch to any room.
DIY Personalized Wall Art: Crafting Character with Burlap and a Repurposed Frame
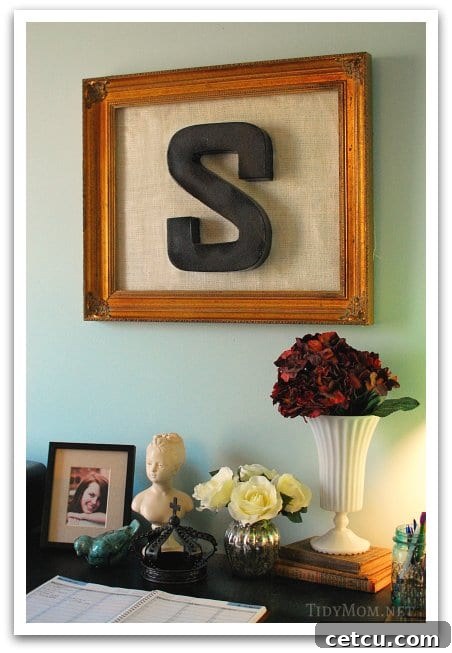
Are you looking to infuse your living space with a touch of personal flair without breaking the bank? Or perhaps you’re like me, constantly on the hunt for unique decor pieces to complete the look of a specific room, such as a home office. There’s immense satisfaction in crafting something beautiful and meaningful with your own hands, especially when it involves repurposing forgotten items into stunning focal points. This tutorial will guide you through creating a charming and incredibly affordable piece of personalized wall art, perfect for adding character to any room – from a bustling home office to a cozy bedroom or a welcoming entryway.
The Allure of DIY Decor: Why Make Your Own Wall Art?
In a world dominated by mass-produced items, handmade decor stands out. Crafting your own wall art offers a multitude of benefits that extend far beyond mere aesthetics:
- Unparalleled Personalization: Unlike store-bought art, a DIY piece reflects your unique style, taste, and story. You choose the colors, textures, and elements that resonate with you, creating a truly one-of-a-kind statement that speaks volumes about your personality.
- Budget-Friendly Elegance: High-quality wall art can be surprisingly expensive. This project demonstrates how inexpensive materials – often found at thrift stores, craft shops, or even within your own home – can be transformed into something that looks far more costly than it is. It’s smart decorating for the savvy homeowner.
- Sustainable & Eco-Conscious: Repurposing an old frame breathes new life into an item that might otherwise end up in a landfill. It’s a small but meaningful step towards a more sustainable lifestyle, proving that beauty and environmental responsibility can go hand-in-hand.
- A Sense of Accomplishment: There’s a profound joy and pride that comes with stepping back and admiring something you’ve created. Each time you look at your handmade art, you’ll be reminded of your creativity and effort, fostering a deeper connection with your living space.
- Therapeutic Process: Engaging in a craft project can be a wonderful way to de-stress and unwind. The focus required for measuring, painting, and assembling can be meditative, providing a much-needed break from daily routines and a fulfilling creative outlet.
My own journey to create this specific piece of wall art began several months ago when I stumbled upon some paper mache 12-inch letters at Joann Fabrics, priced at an irresistible $3.99 each. At the time, I wasn’t entirely sure what their ultimate purpose would be, but their potential for customization was undeniable. The inspiration truly struck when I was focused on refining the walls of my office, a space that truly benefits from thoughtful, personal touches and a bit of creative flair.
Gather Your Supplies: Materials for Your Artistic Endeavor
One of the beauties of this project lies in its simplicity and the accessibility of its materials. Most items can be sourced affordably, often with a story of their own, making the creation process even more special.
- An Old Wooden Frame: The heart of your project!
- What to look for: Head to your local resale shops, thrift stores, garage sales, or even raid your attic. Don’t be afraid of frames with minor imperfections or outdated finishes; these can often be painted, distressed, or restored to match your vision. My own find was a fantastic wooden frame from a resale shop, a true steal at just $8. Consider the size and general style – a sturdy frame is key, as it will hold your design.
- Preparation: Clean it thoroughly. If it has glass, you’ll likely remove it for this project. If you plan to paint the frame, give it a light sanding to help the new paint adhere better and ensure a smooth, lasting finish.
- Paper Mache Letter (or other motif): The personalized touch.
- Selection: Choose an initial that holds meaning to you – perhaps your first name, last name, or the initial of a loved one. My choice was the letter “S,” significant because both my husband’s first name and our last name begin with it. Craft stores like Joann Fabrics, Hobby Lobby, or Michaels are excellent sources for these affordable, ready-to-decorate letters. They come in various sizes, fonts, and thicknesses, allowing for diverse design choices.
- Alternatives: Don’t limit yourself to paper mache! You could use a wooden letter, a silhouette cut from sturdy cardstock or thin plywood, a small decorative element, or even a symbol that resonates with you and your home’s aesthetic.
- Burlap Fabric: The rustic backdrop.
- Quantity: You’ll need enough to cover the opening of your frame with a few inches to spare on all sides for stapling. Burlap is readily available by the yard at most fabric stores and is relatively inexpensive, making it a cost-effective choice.
- Why Burlap? Its natural, coarse texture adds a wonderful rustic and organic feel, providing a perfect contrast to a painted letter. It’s also durable, relatively easy to work with, and offers a neutral base that complements many decor styles.
- Alternatives: For a different look, consider linen for a softer texture, a patterned cotton fabric for a pop of color, corkboard for a functional element, a piece of vintage wallpaper for a unique design, or even a canvas painted a solid color for a modern touch.
- Spray Paint (for the letter): To give your letter a polished finish.
- Color Choice: Select a color that will stand out vibrantly against your burlap background and complement your room’s existing decor. I opted for classic black, which provides a strong, sophisticated contrast and a timeless appeal.
- Type: A good quality acrylic spray paint or craft paint will work perfectly. Matte, satin, or gloss finishes can all create different effects.
- Staple Gun & Staples: For securing the burlap.
- Tool: A basic hand-powered staple gun is all you need for this project. Ensure you have appropriately sized staples that are long enough to securely fasten the burlap to the frame without poking through the front.
- Small Nail or Picture Hanger: For hanging your letter.
- Method: A small finish nail is ideal for this project, as it can be inserted directly through the burlap with minimal fuss. Alternatively, you could use a strong adhesive like hot glue or heavy-duty mounting strips if you prefer not to use a nail or want a flatter appearance for the letter.
- Basic Crafting Tools: Keep essentials like sharp scissors, a ruler or measuring tape for accuracy, a pencil for marking, and protective newspaper or a drop cloth for painting areas to maintain a clean workspace.
Step-by-Step Guide: Crafting Your Personalized Wall Art
With your materials gathered, let’s dive into the creative process. This project is incredibly forgiving and allows for plenty of personal touches at each stage, making it enjoyable for crafters of all skill levels.
Step 1: Preparing Your Paper Mache Letter
Begin by giving your paper mache letter a fresh coat of paint. For my “S,” I chose a sleek black spray paint, which created a bold contrast against the natural burlap. Find a well-ventilated area, preferably outdoors or in a garage with open windows, and lay down newspaper or a drop cloth to protect your surfaces from overspray. Apply several thin, even coats of spray paint, allowing each coat to dry completely before applying the next. This layered approach prevents drips, ensures uniform coverage, and results in a smooth, professional finish. If you desire a distressed look, you could gently sand parts of the letter after the paint has cured, or add a clear matte sealant for additional protection and durability.
Step 2: Readying Your Repurposed Frame
The beauty of a repurposed frame is its inherent character and potential for transformation. As I contemplated my $8 find, I debated whether to leave its original gold finish or paint it white. For now, I’m quite fond of the gold, as it adds a touch of vintage charm and warmth that beautifully complements the rustic burlap. If your frame’s existing finish doesn’t suit your aesthetic, this is the perfect time to transform it. Start by cleaning it thoroughly. If needed, sand it lightly to create a rough surface for better paint adhesion, then clean off any dust. Apply spray paint or chalk paint in your desired color. White offers a clean, contemporary look, while a bold color can make the frame pop as a statement piece. Always allow ample drying time between coats and before handling.
Step 3: Attaching the Burlap Backing
Measure the opening on the back of your frame. Cut a piece of burlap fabric that is several inches larger on all sides than this opening. This extra fabric will give you enough material to wrap around the frame’s edges for secure stapling. Lay the frame face down on a clean, flat surface. Center the burlap over the back opening, ensuring it is taut and smooth, without any wrinkles or sagging. Starting from the middle of one side, use your staple gun to secure the burlap to the back edge of the frame. Pull the burlap tightly as you move to the opposite side and staple, then repeat for the remaining two sides. Work your way around the entire frame, adding staples every few inches, ensuring the fabric remains stretched evenly and securely. Trim any excess burlap for a neat and professional finish.
Step 4: Positioning and Hanging Your Frame
Now it’s time to find the perfect spot for your newly adorned frame. I chose to hang mine proudly over my husband’s desk in the office, where it serves as a lovely, personal accent and a constant source of inspiration. Before making any permanent marks, hold the frame up to experiment with different heights and positions. Use a level to ensure the frame hangs perfectly straight, creating a polished look. Consider the height and surrounding decor to make sure your art piece is a focal point without overwhelming the space. If you’re creating a gallery wall, think about its placement relative to other pieces to achieve a balanced and harmonious arrangement.
Step 5: Securing Your Personalized Letter
Once the frame is securely on the wall, it’s time to add your painted letter. Hold the letter against the burlap background to find the ideal centered position. For this project, a simple small finish nail did the trick! I carefully stuck the nail directly into the wall, right through the burlap fabric, ensuring it was strong enough to hold the letter’s weight without causing damage. Then, I simply hung the letter “S” in the middle of the frame, allowing it to rest gently against the burlap, creating a subtle three-dimensional effect. Alternatively, for a flatter look or if you prefer not to use a nail, you could use strong double-sided tape or a small dot of hot glue applied to the back of the letter to adhere it directly to the burlap backing.
Voilà! Your personalized wall art is complete and ready to admire. It’s perfect for now, and the beauty is, you can always change elements later if your style evolves!
Customization Ideas & Expanding Your Creativity
While this tutorial provides a fantastic foundation for a beautiful piece of decor, the possibilities for customization are virtually endless. Think of this project as a canvas for your creativity, allowing you to adapt it to any theme, season, or personal preference:
- Beyond Initials: Instead of a single letter, spell out short words like “HOME,” “LOVE,” “FAMILY,” “WELCOME,” or “CREATE” for a more expressive statement. You could also incorporate a significant date, coordinates, or a meaningful symbol that holds personal importance.
- Fabric Variations: Experiment with different fabric textures and patterns to achieve diverse looks. Think distressed denim for a casual, industrial vibe; elegant linen for a sophisticated touch; or even a bold patterned cotton for a vibrant pop of color. For holiday decor, seasonal fabrics like plaid or festive prints would be charming and easily changeable.
- Frame Transformations: Don’t limit yourself to solid paint colors! You could distress the frame for a shabby-chic aesthetic, decoupage it with patterned paper or vintage maps, wrap it in twine or rope for a nautical feel, or even add small embellishments like rosettes, decorative corners, or antique hardware.
- Layering and Embellishments: Add depth and visual interest by layering smaller frames within the main one, perhaps showcasing a tiny photo or a piece of pressed foliage. Attach small faux flowers, buttons, vintage keys, charms, or other trinkets to the burlap or the letter itself for extra texture and personality.
- Thematic Decor: Adapt the concept for specific rooms or occasions. For a nursery, use a child’s initial with soft pastel fabrics and whimsical embellishments like felt clouds or stars. For a kitchen, consider a letter like “E” for “Eat,” “C” for “Coffee,” or a small silhouette of kitchen utensils. For seasonal displays, swap out the letter or add festive accents.
Gold Frame or White? Your Opinion Matters!
As I mentioned, I initially thought about painting the frame white to match a more modern aesthetic, but I’ve grown quite fond of its original gold finish. It adds a lovely warmth and a touch of vintage flair that beautifully complements the rustic burlap and stands out against the office wall. However, a crisp white would undoubtedly offer a cleaner, more contemporary, perhaps farmhouse-chic, aesthetic. What do you think? Does the gold work well with this design, or would a fresh coat of white paint elevate it further and integrate it better into a different style? Share your thoughts – I’d love to hear your design perspective and what choices you would make!
**********
Crafting personalized home decor doesn’t have to be complicated or expensive. This DIY wall art project is a testament to how simple materials and a little imagination can create something truly special and meaningful for your home. It’s an opportunity to express your personality, save money, and enjoy the fulfilling process of making. So, grab an old frame, some burlap, and a letter, and start creating your own masterpiece today!
I’d love for you to connect with us and our community!
Share your creative projects, design inspirations, and more!
Find us and share your creations!