
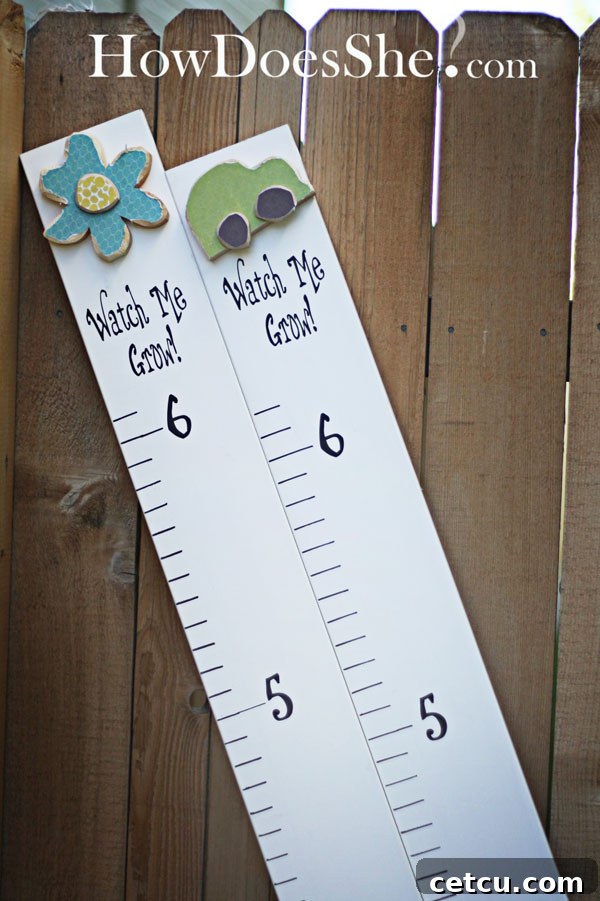
Today, we’re thrilled to share a fantastic crafting project that blends sentimentality with practicality, brought to you by creative minds! Say goodbye to marking fleeting heights on door frames. This comprehensive guide will show you how to create a beautiful and durable wood growth chart, an ideal solution for modern families. Unlike permanent wall markings, this portable chart can be easily moved, making it a cherished keepsake for years to come and a truly memorable gift idea for loved ones.
Craft Your Own Timeless Wood Growth Chart: A DIY Guide for Lasting Memories
Why a DIY Wood Growth Chart is the Ultimate Keepsake for Modern Families
In a world where families frequently relocate, preserving precious memories can be a significant challenge. Traditional height markings on door frames, while charming and nostalgic, are unfortunately left behind when you move. This impermanence is precisely why a DIY wood growth chart has become an incredibly popular and meaningful project for countless families. It offers a tangible, portable record of your children’s growth, allowing you to carry those cherished milestones and memories with you, no matter where life takes your family. More than just a simple measuring tool, it evolves into a rich piece of family history, serving as a heartfelt focal point in any child’s room and a beautiful heirloom to pass down through generations. Imagine looking back years from now, seeing all the marks, names, and dates, bringing floods of joyful memories of childhood.
Beyond its profound sentimental value, a handmade growth chart is also a fantastic way to personalize your home decor. You have the creative freedom to customize it to perfectly match your child’s room theme, choose colors that complement your home’s aesthetic, and add unique details that truly reflect your family’s personality. It’s a relatively simple project that yields impressive, long-lasting results, making it an ideal craft for both beginners and experienced DIY enthusiasts alike. The satisfaction of creating something so meaningful with your own hands is unparalleled. Let’s gather our supplies and embark on creating this special piece for your home or as a thoughtful, personalized gift.
Essential Materials for Your Personalized Wood Growth Chart Project
Before diving into the creative process, it’s crucial to ensure you have all the necessary tools and materials at hand. Investing in quality materials will not only make the crafting process smoother but will also contribute significantly to the durability and aesthetic appeal of your finished growth chart.
- 1x6x6 MDF Board: You’ll typically find these at your local hardware store in standard 8-foot lengths. Don’t hesitate to ask the friendly store associates to cut it down to a more manageable 6-foot length for you. MDF (Medium-Density Fiberboard) is an excellent choice for this project due to its remarkably smooth surface, inherent stability, and affordability, making it ideal for painting and applying vinyl decals without warping.
- White Paint: A good quality acrylic or latex paint designed for wood surfaces will provide a durable, washable, and smooth finish. You might opt for a semi-gloss or satin finish for enhanced durability and easier cleaning. While white offers a classic, versatile backdrop, feel free to explore other colors that perfectly match your decor or child’s room theme!
- Wooden Topper(s): These decorative elements add a charming and personalized touch to the very top of your growth chart. You can challenge yourself by cutting your own unique shapes from scrap wood using a band saw, or conveniently find a wide variety of pre-made wooden shapes (such as stars, clouds, animals, or even simple geometric designs) at craft stores like Michael’s.
- Black Vinyl Decal – “Watch Me Grow”: A 4×4 inch decal with this endearing phrase adds a truly charming and inspirational sentiment to your chart. Choose any font style that appeals to you and complements your overall design. Vinyl provides a crisp, professional, and long-lasting look that resists fading and smudging.
- Black Vinyl Numbers (2, 3, 4, 5, 6): Opt for 2-inch tall numbers. These will serve as clear and easy-to-read markers for the feet measurements on your chart. Again, selecting a font that harmonizes with your “Watch Me Grow” decal will create a cohesive and aesthetically pleasing design.
- Wood Glue / Hot Glue Gun: Wood glue offers a superior, strong, and permanent bond for securely attaching wooden components like your decorative toppers. While a hot glue gun can be a quick alternative for certain temporary steps, for lasting adhesion and structural integrity, wood glue is generally the preferred choice due to its greater strength and durability.
- Long Tape Measure or Yardstick: This tool is absolutely essential for achieving accurate measurements and precise markings, ensuring your growth chart functions correctly.
- Fine-Tip Sharpie Marker: For drawing the crisp, permanent measurement lines. A fine-tip permanent marker ensures the lines won’t smudge, fade, or bleed over time, maintaining the chart’s readability for years.
- Picture Hanger (Sawtooth Style): This “sawtooth” metal hanger, commonly found on the back of picture frames, will allow you to securely and easily hang your finished growth chart on the wall. Ensure it’s rated for the weight of your board.
- Straight Edge / Ruler (at least 24 inches long): Crucial for drawing perfectly straight and consistent measurement lines across the board, providing a professional finish.
- Pencil: For initial, erasable markings and layout planning before committing with a permanent marker.
- Sandpaper (fine grit): Essential for smoothing any rough edges on the MDF board and preparing its surface for optimal paint adhesion.
- Mod Podge (optional): If you choose to apply decorative paper designs to your toppers, Mod Podge acts as an excellent adhesive and a protective sealant, giving a smooth finish.
Step-by-Step Guide: Crafting Your Personalized Growth Chart for Children
Step 1: Prepare and Paint the MDF Board for a Smooth Finish
Begin your project by thoroughly preparing your MDF board to ensure it’s perfectly smooth and ready for paint. If there are any rough edges resulting from the cutting process, gently sand them down with fine-grit sandpaper until they are smooth to the touch. Once sanded, wipe the entire board clean with a slightly damp cloth to meticulously remove any lingering dust or debris, then allow it to dry completely. This crucial preparation step ensures excellent paint adhesion. Once clean and dry, apply your chosen paint (whether classic white or a custom color). For the best and most durable results, apply two to three thin, even coats, allowing each coat to dry thoroughly according to the paint manufacturer’s instructions. This layered approach prevents drips, minimizes brush strokes, and ultimately ensures a beautifully smooth, professional-grade finish. Remember, patience at this stage will significantly enhance the final appearance of your cherished growth chart.
Step 2: Design and Customize Your Unique Toppers
The toppers offer a fantastic opportunity to truly let your creativity shine and inject unique personality into your growth chart! As previously mentioned, you have the option to either cut your own custom shapes from scrap wood using a band saw (a remarkably versatile tool if you have access to one!), or you can conveniently purchase a variety of pre-made wooden shapes from local craft stores. Consider shapes like whimsical clouds, sparkling stars, charming animals, or even the child’s initial for a truly personalized touch. If you’re cutting your own, keep the shapes relatively simple for ease of cutting and always remember to sand the edges smooth for a refined finish.
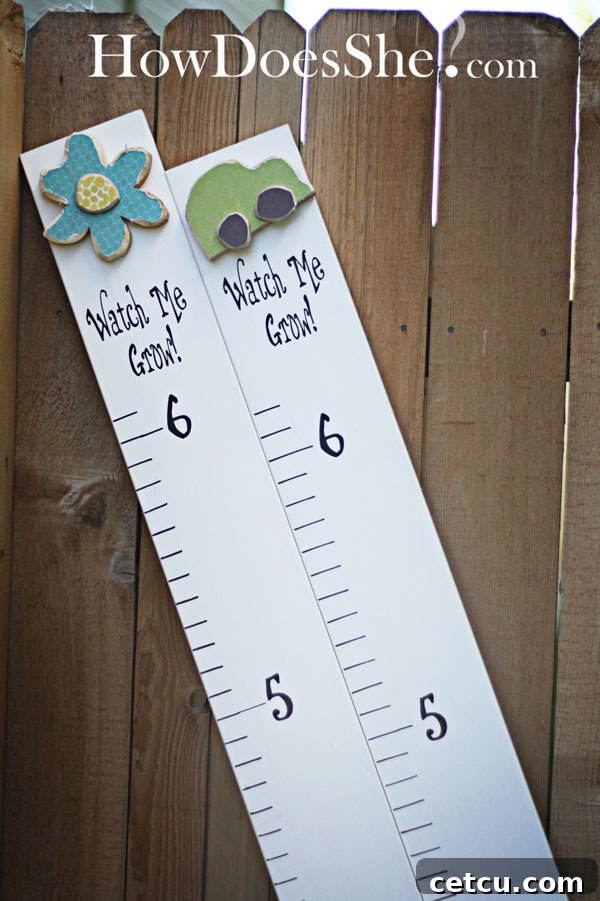
For further customization, you can choose to paint your toppers in coordinating or contrasting colors. Alternatively, as beautifully demonstrated in the original inspiration, you can decoupage decorative paper onto them using Mod Podge. If opting for paper, carefully cut it to the desired size and shape, apply a thin, even layer of Mod Podge to the topper, then meticulously position the paper, gently smoothing out any air bubbles with your fingers or a craft tool. Finally, apply another thin layer of Mod Podge over the top of the paper to seal and protect it, giving it a durable finish. Once completely dry, you can gently sand the edges of the paper for a seamless and polished look. These thoughtful details will undeniably make your wood growth chart uniquely yours, adding an extra layer of charm and personalization.
Step 3: Precise Measurement Markings for Accuracy
This step demands meticulous attention to detail to ensure the accuracy of your growth chart. Begin by laying your beautifully painted MDF board on a flat, stable surface. Take your long tape measure or yardstick and align it precisely along one side of the board. The crucial detail here is that you want the bottom of your finished growth chart to represent 15 inches from the floor when it’s eventually hung. Therefore, the very first mark you make on the board with your pencil will correspond to the 15-inch mark on your tape measure. This intelligent offset ensures that when the chart is hung correctly, the measurements indicated on the board will accurately reflect the child’s true height from the floor.
Using your pencil, carefully mark every single inch along the board, starting from the 15-inch point and continuing all the way up to 6 feet 3 inches (which is equivalent to 75 inches). This specific range comfortably accommodates the growth of most children throughout their formative years. For families with exceptionally tall members, you might consider adjusting the starting point (for example, beginning at 20 inches) and extending the highest mark as needed, much like the original creator did for a family with a 7-foot-2-inch husband. After making all your initial pencil marks, retrieve a straight edge (such as a long ruler, yardstick, or even a carpenter’s square) and your fine-tip Sharpie marker. Use these to draw perfectly straight, crisp lines over your pencil marks. Make sure to apply gentle, consistent pressure to avoid any smudges or uneven lines. For the significant foot marks (specifically 2, 3, 4, 5, and 6 feet), draw these lines slightly longer than the individual inch marks. This subtle visual distinction will serve as a clear guide when you place the vinyl numbers later and will make the entire chart much easier and quicker to read.
Step 4: Applying the Professional Vinyl Decals
Once all your measurement lines are completely dry and clearly visible, it’s time for the exciting step of applying your vinyl decals. Carefully peel the backing from your “Watch Me Grow” decal (the 4×4 inch vinyl) and meticulously center it near the very top of your growth chart, ideally positioned just above the highest measurement mark. Smooth it down firmly with your fingers or a squeegee tool, working diligently from the center outwards to eliminate any potential air bubbles and ensure perfect adhesion.
Next, proceed to apply the 2-inch vinyl numbers (2, 3, 4, 5, 6). Align each number precisely with its corresponding longer foot-mark line that you so carefully drew in the previous step. For instance, the number ‘2’ should be placed neatly next to the 2-foot mark, ‘3’ next to the 3-foot mark, and so on, maintaining consistent spacing and alignment. Take your time with this step; precision here ensures the numbers are straight, evenly spaced, and perfectly legible. The vinyl adds a wonderfully clean, professional, and durable finish that will beautifully withstand years of use and admiration.
Step 5: Final Assembly and Secure Hanging Hardware
Now, it’s time to securely attach your beautifully prepared toppers to the top of the MDF board. For a bond that is both secure and enduring, high-quality wood glue is unequivocally recommended. Apply a thin, even layer of wood glue to the entire back surface of each topper and then firmly press it onto the board in its desired position. Hold it firmly in place for a few moments and allow ample drying time, ideally overnight, for the wood glue to fully cure and achieve maximum strength. While a hot glue gun offers a much quicker initial hold, it is generally not as permanent for this type of application and may, unfortunately, lead to the toppers detaching over time due to temperature changes or minor impacts. If wood glue is temporarily unavailable, a staple gun can also provide a surprisingly sturdy attachment, just be mindful of staple placement to maintain aesthetics.
Finally, attach the sawtooth picture hanger to the very top center of the back of your growth chart. Ensure it is securely fastened with small nails or screws, making sure they do not pierce through to the front. This simple yet essential hardware will allow you to easily and safely hang your beautiful new keepsake on any wall, ready to capture years of precious memories.
Personalizing Your Growth Chart: Beyond the Basics for a Unique Touch
While the instructions provided above offer a solid foundation for creating a beautiful and functional growth chart, don’t hesitate to infuse it with even more personality and unique touches that reflect your family’s style.
- Custom Color Palette: Instead of the classic white, consider painting the entire board a vibrant color that perfectly matches your child’s room decor, or opt for a more sophisticated, neutral tone like soft gray or warm beige to seamlessly fit into any home aesthetic.
- Additional Decorative Details: Unleash your creativity by using stencils to add a child’s name, birth date, or a favorite quote at the top or bottom of the chart. You could also paint small, whimsical designs such as scattered stars, cheerful polka dots, or a subtle border along the edges for an extra decorative flourish.
- Engaging Milestone Marking: Encourage all family members to actively participate by writing their names, the date, and even a brief note next to their height marks. This practice transforms the chart into a truly unique and evolving family record, capturing not just heights but also moments and memories over the years.
- Protective and Durable Finish: For enhanced durability, greater ease of cleaning, and protection against wear and tear, strongly consider applying a clear coat of polyurethane, a clear acrylic sealant, or a similar protective finish over the entire completed chart. This will safeguard the paint and vinyl from scratches, smudges, and moisture, ensuring your heirloom lasts for generations.
A Gift That Grows with Them: The Perfect Thoughtful Present
One of the most heartwarming and compelling reasons to dedicate your time to creating a wood growth chart is its incredible potential as a truly meaningful gift. Imagine the joy and surprise of presenting this exquisitely handcrafted treasure at a baby shower, a child’s birthday celebration, a thoughtful holiday present, or even as a special housewarming gift for a new family. It’s far more than just a simple gift; it’s an experience, a memory-maker, and a future heirloom that will be cherished and admired as the child grows from infancy through their school years and beyond. Unlike many toys that are quickly outgrown or forgotten, this personalized growth chart will remain a relevant, beloved, and enduring item in their home for many, many years. It eloquently represents thoughtfulness, personal effort, and a deep appreciation for the recipient’s unique family journey. Every single mark on the chart will tell a rich story, creating an emotional connection and a tangible timeline that few other gifts can ever hope to achieve.
Important Hanging Tip: Ensuring Accurate Measurements from the Start
When it comes to hanging your beautifully finished wood growth chart, absolute accuracy is paramount to ensure all future measurements are correct. Remember the 15-inch offset we meticulously incorporated into the measurement markings during Step 3? This crucial design element means you should NOT hang the chart directly from the floor. Instead, precisely measure 15 inches up from the floor, and that exact point is where the very bottom edge of your growth chart should align. Utilize a level to ensure your chart hangs perfectly straight on the wall, preventing any skewed measurements. This simple yet vital step guarantees that every height marked on your personalized chart will be accurate and consistent relative to the child’s true height from the ground up, making it a reliable record for years to come.
Done!
Congratulations! You’ve successfully created a beautiful, personalized wood growth chart. This project is much more than just a craft; it’s a heartfelt investment in capturing priceless memories and a charming, meaningful addition to any home. Enjoy the incredible journey of watching your little ones grow taller, and cherish every single story each mark on this unique heirloom will tell for generations to come.
About Our Collaborator: HowDoesShe.com
We’re incredibly proud to feature insights and creative inspiration from HowDoesShe.com, a vibrant and empowering online community dedicated to inspiring women to excel in all aspects of their lives. Whether it’s discovering ingeniously creative crafts, mastering essential household tips, or embracing profound personal growth, HowDoesShe.com offers a collaborative and supportive platform for women to share innovative ideas and empower one another to be their best selves.
Founded by the dynamic trio Alison, Shelley, and Missy, these inspiring women continually find innovative and engaging ways to share their wisdom and creativity, even amidst their incredibly busy schedules. We encourage you to connect with them and explore even more amazing ideas and projects that can enrich your life!
Facebook |
Twitter