
Make Irresistible Homemade Peanut Butter Eggs for Your Easter Baskets and Beyond!

There’s something truly special about a homemade treat, especially when it involves the universally adored combination of peanut butter and chocolate. This recipe for homemade peanut butter eggs isn’t just a delightful confection; it’s a gesture of love, a touch of nostalgia, and a guaranteed crowd-pleaser for any occasion, particularly during the festive Easter season.
I recall a recent weekend getaway to Chicago – a lovely blend of business and pleasure. While I cherished my time in one of my favorite cities, I knew my husband, after 25 years of marriage, still isn’t fond of us spending nights apart. So, instead of bringing back a generic airport souvenir, I decided to craft something truly heartfelt and special for his return. And what better way to win over his heart than with his absolute favorite indulgence?
The Magic of Homemade: Better Than Store-Bought!
For my husband, Reese’s Peanut Butter Cups hold a special place, but he always claims that Reese’s *eggs* are a divine creation. He raves about the perfect peanut butter to chocolate ratio found in the egg shape, often stating they simply taste fresher. While store-bought versions are undoubtedly delicious, crafting them at home offers an unparalleled level of freshness, customization, and that undeniable personal touch.
The beauty of making your own chocolate-covered peanut butter eggs is the complete control you have over the ingredients. You can choose your favorite type of chocolate – rich dark, creamy milk, or even sweet white chocolate. For those with peanut allergies or simply looking for an alternative, substituting the peanut butter with almond butter or even Biscoff spread opens up a world of possibilities. Imagine a Biscoff version, perhaps with Biscoff cookies crushed instead of graham cracker crumbs! The options are endless, making this recipe incredibly versatile and adaptable to various palates and dietary needs.
From Our Kitchen to Yours: The Story Behind This Easy Recipe
This delightful recipe is actually inspired by some of my past culinary adventures. Digging through my archives, I stumbled upon a recipe for no-bake peanut butter bumble bees from April 2009, which shares a similar foundation with my krispie peanut butter balls often made during Christmas. It struck me then: this simple, no-bake peanut butter base would be absolutely perfect for creating homemade peanut butter eggs!
What I love most about this recipe is its simplicity. Despite involving melted chocolate and dipping, which can sometimes be a bit messy (a little hint: always lay down plenty of wax paper for an easy cleanup!), it’s incredibly fun and rewarding. The “no-bake” aspect makes it accessible to even novice bakers, ensuring a delicious outcome without the need for an oven. It’s a fantastic project for a relaxing afternoon, and even better, it’s a wonderful activity to do with kids, letting them get creative with the shapes and decorations.
This post may contain affiliate links. Please read my disclosure policy here.
Step-by-Step Guide to Perfect No-Bake Peanut Butter Eggs
Creating these delightful treats is a straightforward process, designed for maximum enjoyment with minimal fuss. Here’s a detailed breakdown to ensure your homemade peanut butter eggs turn out perfectly every time.
Ingredients You’ll Need
Before you begin, gather your high-quality ingredients. The creamy peanut butter forms the heart of these eggs, so choose one you love. Unsalted butter, softened to room temperature, ensures a smooth dough. Graham cracker crumbs add a delightful texture and slight crunch. Powdered sugar sweetens and helps bind the mixture, while a touch of sea salt perfectly balances the rich flavors. And, of course, your chosen chocolate and a little shortening for a smooth melt and dip.
Mixing the Dreamy Peanut Butter Dough
The first step is incredibly simple: combine the creamy peanut butter, softened unsalted butter, graham cracker crumbs, powdered sugar, and sea salt in a large bowl. Mix these ingredients thoroughly until they are well combined and form a cohesive dough. If you don’t have a stand mixer, don’t hesitate to use your hands – it’s often the most effective way to ensure everything is perfectly incorporated and the dough reaches the right consistency. The dough should be firm enough to roll but still pliable.
Shaping and Chilling for Success
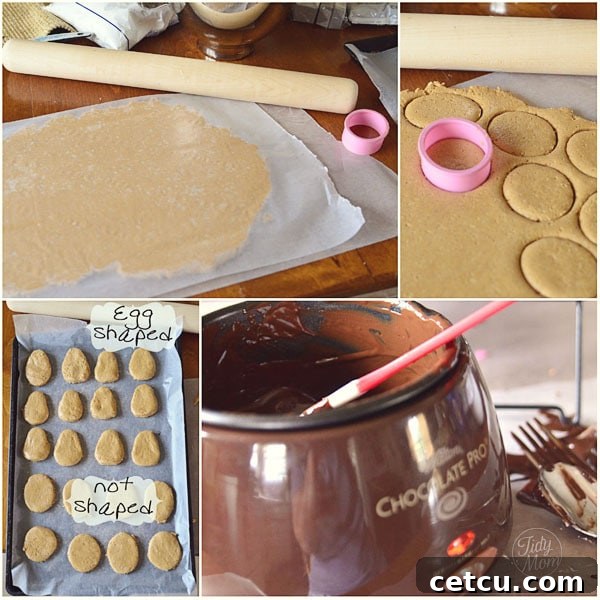
Once your dough is ready, roll it out onto a wax paper-lined surface to a generous 1/4-inch thickness. For easier rolling and to prevent sticking, place another piece of wax paper over the dough before you begin. This technique helps achieve an even thickness and keeps your rolling pin clean. Remove the top wax paper, and then, using a small oval cookie cutter (or any shape you prefer for other holidays!), cut out your eggs. Gently place these cutouts on a wax paper-lined pan. Feel free to give them a bit of an egg shape by lightly pinching the tops and flattening the bottoms if you like, or simply leave them as perfect ovals. Re-roll any dough scraps and cut again to minimize waste. The crucial next step is to pop the pan into the freezer for about an hour. This chilling time is vital as it firms up the peanut butter centers, making them much easier to dunk in chocolate without falling apart.
The Art of Chocolate Dipping
While your peanut butter centers are firming up in the freezer, prepare your chocolate. Melt your chosen chocolate (milk, semi-sweet, or dark) with the shortening according to the package instructions. The shortening helps create a smoother, more fluid chocolate coating that hardens beautifully. I highly recommend using a Wilton Chocolate Pro Melting Pot for this step, as it keeps the chocolate at a consistent, ideal temperature for dipping. Once the centers are frozen solid, use a fork to carefully dunk each egg into the melted chocolate, ensuring it’s fully coated. Tap off any excess chocolate gently before transferring it to another wax paper-lined baking sheet. The cold peanut butter centers will help the chocolate set quickly.
Creative Decoration Ideas
The moment you lay out the chocolate-covered eggs is the perfect time to add any desired sprinkles or decorations before the chocolate completely sets. Once the chocolate has hardened, you can take your creativity a step further! Decorate with pastel-colored candy melts, drizzling them in intricate patterns or writing names for personalized Easter treats. Imagine these adorable eggs nestled in Easter baskets, perhaps placed in clear cellophane bags tied with a pretty ribbon – they make charming gifts!

Unleash Your Creativity: Customizing Your Peanut Butter Eggs
The real joy of making these treats at home lies in the endless possibilities for customization. Don’t limit yourself to just the classic peanut butter. As mentioned, almond butter, cashew butter, or even sunflower seed butter can be fantastic alternatives, catering to different tastes or allergies. For a truly unique twist, try incorporating finely chopped toasted nuts into the peanut butter mixture for added crunch, or a hint of spices like cinnamon or nutmeg for a warm, comforting flavor profile.
Beyond the filling, think about your chocolate choices. A blend of milk and dark chocolate can offer a sophisticated flavor, while white chocolate can be dyed with food coloring for vibrant, festive eggs. You can also experiment with different toppings: finely chopped pretzels for a salty-sweet crunch, shredded coconut for a tropical twist, or even a dusting of cocoa powder for an elegant finish. The Easter season particularly lends itself to pastel-colored drizzles or small candy decorations, transforming each egg into a tiny work of art.
Storing Your Delights and Sharing the Joy
To ensure your homemade peanut butter eggs remain fresh and don’t melt, store them in an airtight container in the refrigerator. They will keep well for up to two weeks, though it’s highly unlikely they’ll last that long! These delightful confections are not just for personal enjoyment; they are perfect for sharing. Package them beautifully for homemade gifts, add them to holiday dessert platters, or simply keep a stash in the fridge for a quick, satisfying treat. My goal in life is to bring happiness to my family, and I can tell you, making these homemade peanut butter eggs definitely brought smiles all around!
What’s your favorite candy to make or receive? Share your sweet confessions!

No-Bake Chocolate Covered Peanut Butter Eggs Recipe
30 eggs
30 minutes
1 hour
1 hour 30 minutes
Ingredients
For the Peanut Butter Filling:
- 1¼ cup creamy peanut butter
- 5 Tablespoons unsalted butter, softened
- ¾ cup graham cracker crumbs
- 1 cup powdered sugar
- ½ teaspoon sea salt
For the Chocolate Coating:
- 14 ounces chocolate (milk, semi-sweet, or dark, your preference)
- 1-2 Tablespoons shortening (e.g., Crisco)
Instructions
- In a large bowl, combine peanut butter, softened butter, graham cracker crumbs, powdered sugar, and sea salt. Mix thoroughly until all ingredients are well combined and form a cohesive dough. You may need to use your hands to ensure everything is fully incorporated.
- On a wax paper-lined surface, roll out the peanut butter dough to a generous ¼-inch thickness. For easier rolling and to prevent sticking, place another piece of wax paper on top of the dough. Remove the top wax paper and use a small oval cookie cutter to cut out egg shapes. Place the cut eggs onto a clean wax paper-lined baking pan. Re-roll any dough scraps and cut additional eggs until all dough is used.
- Place the baking pan with the cut peanut butter eggs into the freezer for one hour, or until they are firm. This step is crucial for easy dipping.
- While the eggs are chilling, prepare your chocolate coating. In a microwave-safe bowl or using a double boiler, melt the chocolate and shortening together. Stir until smooth and completely melted. If using a microwave, heat in 30-second intervals, stirring between each, to prevent burning.
- Once the peanut butter eggs are firm, use a fork to carefully dunk each frozen egg into the melted chocolate, ensuring it’s fully coated. Gently tap the fork against the side of the bowl to remove any excess chocolate. Slide the chocolate-covered egg onto a fresh wax paper-lined baking sheet.
- Refrigerate the chocolate-covered eggs until the chocolate is completely set, which typically takes about 15-30 minutes. Once set, enjoy your delicious homemade treats!
Notes
These eggs can be made using any cookie cutter shape you prefer, or you can even shape the dough by hand into balls, squares, or other festive forms. For an extra touch, decorate with sprinkles, drizzles of contrasting melted chocolate, or edible glitter before the chocolate sets.
Did you make this recipe?
We’d love to see your creations! Please leave a comment on the blog below, or share a photo on Instagram using #HomemadePeanutButterEggs.
The Sweet Reward of Sharing Homemade Happiness
There’s an undeniable charm and satisfaction in making candy from scratch. These homemade chocolate-covered peanut butter eggs embody that spirit perfectly. They are simple to create, incredibly delicious, and offer a wonderful opportunity to personalize a classic treat. Whether you’re making them for Easter baskets, as a thoughtful gift, or simply to indulge your own sweet cravings, these no-bake wonders are sure to become a beloved recipe in your kitchen.
So, gather your ingredients, get ready for a little joyful mess, and prepare to delight everyone with these exceptional peanut butter eggs. Happy making!
More Homemade Candy Recipes You May Enjoy:
- Homemade Peanut Butter Cups
- Homemade Twix Bars
- Homemade Snickers Bars
- Homemade Milky Way Bars
Love This Homemade Peanut Butter Eggs Recipe? Pin It for Later!