
Craft Your Own Stunning Vintage-Inspired Ornament Wreath for Under $15!
(Image courtesy of Kaboodle)
Have you ever admired those beautiful, glittering vintage glass ball wreaths that evoke timeless holiday charm? They are undeniably stunning, but their price tags often tell a different, less joyful story. These festive decorations, often heirloom pieces or high-end reproductions, can cost a small fortune, making them an elusive dream for many who wish to adorn their homes with such festive elegance. But what if you could capture that same classic beauty without breaking the bank? What if the secret to achieving that coveted vintage look was not in spending more, but in creating it yourself?
Inspired by the brilliant Andrea at Big Creek Cottage and her insightful post, I decided to take matters into my own hands. Her empowering philosophy truly resonated with me, echoing a sentiment that many DIY enthusiasts embrace wholeheartedly: a commitment to resourcefulness and creativity over consumerism. It’s about transforming inspiration into tangible beauty, proving that with a little ingenuity and elbow grease, you can replicate high-end looks on a budget. This project was born from that very desire – to craft something beautiful, meaningful, and most importantly, affordable.
If you can’t buy it… MAKE it!
That’s EXACTLY the motto I adopted for this project, and I’m thrilled to share that it worked wonders! I managed to create a breathtaking ornament wreath for just under $15! Yes, you read that right. This incredible saving meant I could achieve a designer-look holiday decoration without the usual financial strain. The feeling of accomplishment, coupled with the joy of decorating my home with a piece I made myself, was truly AWESOME! It’s a testament to the power of DIY and how accessible stunning home decor can be if you’re willing to invest a little time and creativity.
Gather Your Materials: Crafting a Stunning Wreath on a Budget
Unlike the traditional vintage wreaths that feature delicate (and expensive!) glass ornaments, I opted for a more practical and budget-friendly approach. My secret? Shatterproof ornaments from Walmart. Not only do these modern alternatives cut down significantly on cost, but they also offer peace of mind, especially if you have pets or small children, or if your wreath will be exposed to the elements. The beauty of this choice is that from a distance, or even up close, the effect is just as dazzling as real glass, but without the fragility or the hefty price tag. This smart substitution is key to keeping the project affordable and accessible for everyone.
What You’ll Need (and the Incredible Cost Breakdown):
- 1 Styrofoam wreath from Dollar Tree (I used a 12″ wreath, which is a perfect size for most doors) $1.00
- 1 Roll of red Ribbon from Dollar Tree (Choose a festive color that complements your ornaments and holiday theme) $1.00
- 1 box of 12 medium-sized shatterproof ornaments from Walmart (Opt for a mix of finishes – matte, glossy, glitter – for added visual interest) $2.50
- 3 round containers of mini shatterproof ornaments from Walmart (I selected one container of each color to ensure a diverse palette for filling in gaps and adding depth to the wreath) $3.00 each, totaling $9.00
- Lots of Hot Glue Sticks (A large bag from Dollar Tree is usually sufficient, but having an extra on hand is always a good idea for any hot glue project!) $1.00
Total Estimated Cost: Approximately $14.50!
This careful selection of materials, focusing on affordability without compromising on the festive aesthetic, is what makes this DIY wreath project so appealing. You don’t need specialty craft store items; everyday finds from discount stores and big-box retailers are more than enough to achieve stunning results. Plus, by choosing shatterproof ornaments, you ensure your beautiful creation can be enjoyed for many holiday seasons to come, year after year.
Step-by-Step Guide: How to Create Your Own Stunning Ornament Wreath
HOW TO’s
Crafting this ornament wreath is a straightforward and enjoyable process, perfect for an afternoon DIY session. While it requires a bit of patience and attention to detail, the steps are simple enough for crafters of all skill levels. The key is to work in layers and to apply hot glue generously to ensure all your ornaments are securely attached. Let’s get started on transforming those humble materials into a dazzling holiday masterpiece!
Step 1: Preparing Your Wreath Base with Ribbon
The very first step is to create a clean, colored base for your ornaments. Take your roll of red ribbon and begin to neatly wrap it around the entire Styrofoam wreath form. The goal here is to completely cover the white foam, ensuring that no part of it is visible once your ornaments are attached. This not only provides a lovely background color that peeks through the ornaments but also creates a more finished and professional look for your wreath. Use a dab of hot glue at the beginning and end of the ribbon, and periodically along the back, to keep it taut and securely in place as you wrap. Overlap the ribbon slightly with each pass to ensure full coverage and a smooth, even surface. This foundational step is crucial for the overall aesthetic of your finished piece.
Step 2: Attaching the Larger Ornaments for Structure
Once your wreath base is neatly wrapped in ribbon, it’s time to bring in the stars of the show: your medium-sized ornaments. These will form the primary layer and give your wreath its overall shape and fullness. Begin to hot glue all of the large ornaments onto the ribbon-wrapped wreath. I recommend starting with the top, bottom, and sides to establish a symmetrical foundation, then filling in the gaps. Don’t worry too much about perfect uniformity at this stage; the aim is to create a beautiful, organic cluster, rather than a rigid pattern. Apply a generous amount of hot glue to the top of each ornament (where the hanger typically attaches) and press it firmly against the wreath form. Hold each ornament in place for a few seconds until the glue sets. Work your way around the entire wreath, positioning the larger ornaments close together but allowing for small spaces in between – these gaps will be perfectly filled in during the next step.
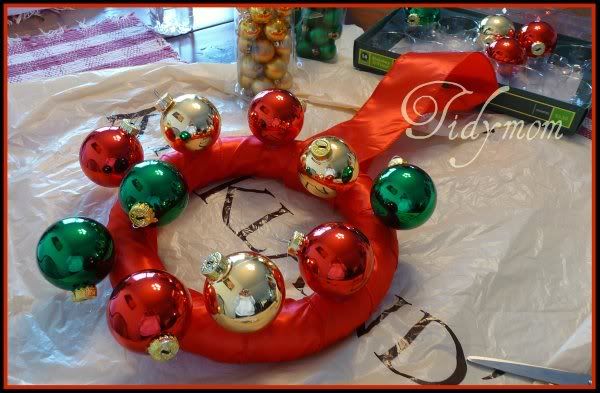
*(Image: Early stage of the wreath, showcasing the ribbon base and initial placement of medium-sized ornaments.)*
Step 3: Filling in with Mini Ornaments for Fullness and Sparkle
With all the large ornaments securely in place, you’ll likely notice several small gaps and openings. This is where your mini ornaments come into play, adding an exquisite layer of detail, texture, and sparkle. Now, you’ll start filling in all of the remaining spaces with the mini ornaments. This is a wonderfully satisfying part of the process, as you watch your wreath transform from a basic structure into a lush, full, and radiant decoration. Select mini ornaments in various colors and finishes to create visual depth and interest. Apply hot glue to the tops of these smaller ornaments and carefully tuck them into every nook and cranny between the larger ones. Don’t be afraid to overlap slightly or position them at different angles to achieve a rich, layered effect. The goal is to eliminate any visible ribbon or Styrofoam, making the wreath appear incredibly abundant with ornaments. Continue this process until you are completely satisfied with the fullness and coverage of your wreath. The more diligently you fill, the more luxurious and expensive your wreath will look.
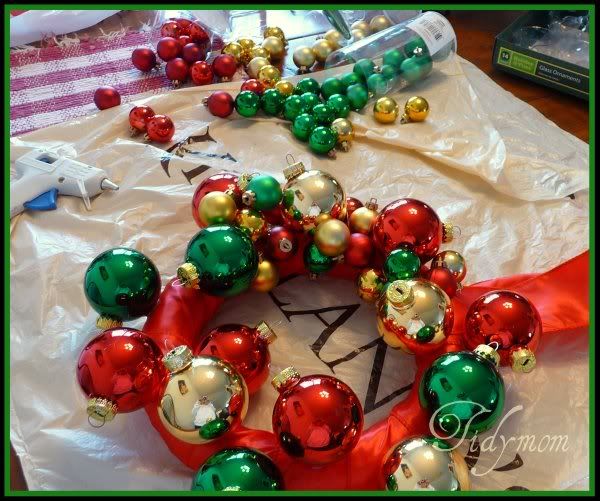
*(Image: Wreath progressing, with smaller ornaments strategically placed to fill in the spaces.)*
The Grand Reveal: Your Finished DIY Masterpiece!
SHAZAM!!! And just like that, with a bit of glue and a lot of festive spirit, you have your very own, stunning, finished ornament wreath! The transformation from a simple foam ring and a handful of budget-friendly ornaments into such a magnificent piece of holiday decor is truly rewarding. It’s an incredible feeling to step back and admire something you’ve created with your own hands, knowing that it’s not only beautiful but also a testament to your creativity and resourcefulness. This wreath isn’t just a decoration; it’s a statement piece, crafted with care and designed to bring cheer to your home for many seasons to come.

Reflections and Tips from the Crafter’s Bench
I LOVE how this wreath turned out! It exceeded my expectations and truly captures that vintage charm I was aiming for. However, it’s worth noting a few things from my experience. This project took a LOT more ornaments than I had initially planned. I had bought enough materials thinking I could make two wreaths, but soon realized one wreath consumed almost all of them. So, my first piece of advice is to always buy more ornaments than you think you’ll need, especially the mini ones – you’ll be surprised how many it takes to achieve a truly full and lush look!
Another point to consider is that the process can be a little frustrating at times. While straightforward, placing each ornament individually and ensuring a consistent, full coverage requires patience. It probably would have been easier if I had aimed for a perfectly uniform placement of the large ornaments, but I specifically didn’t want that overly structured look. I preferred a more organic, clustered aesthetic, which, while more challenging to achieve, ultimately resulted in a wreath with greater character and depth. So, don’t be discouraged if it feels a bit tedious; the end result is absolutely worth the effort!
This experience taught me valuable lessons about planning and execution in DIY projects. It’s a reminder that sometimes the most beautiful outcomes come from embracing a little imperfection and adapting as you go. For anyone attempting this, I highly recommend finding a comfortable spot to work, putting on some festive music, and enjoying the creative journey. The satisfaction of seeing your vision come to life is truly unparalleled.
Displaying and Storing Your Beautiful Wreath
Now that your gorgeous wreath is complete, the next exciting step is deciding where to showcase it! I’m still contemplating the perfect spot for mine – perhaps gracing the front door, adorning a mantelpiece, or adding a festive touch to a bare wall in the living room. It’s versatile enough to brighten any space. As for next year, proper storage is key to preserving its beauty. I’m considering a large, flat storage box or perhaps hanging it on a spare closet wall, carefully covered to protect it from dust and damage. With shatterproof ornaments, you won’t have to worry about delicate glass, making storage much simpler and ensuring your wreath remains stunning for many Christmases to come.
Unleash Your Creativity: Customizing Your Wreath
While I chose a classic red and gold theme, the beauty of this DIY project lies in its endless customization possibilities. Imagine a wreath sparkling with cool blues and silvers, perfect for a winter wonderland theme, or perhaps vibrant jewel tones for a bohemian holiday look. You could incorporate different ornament textures – matte, glitter, metallic, or even frosted finishes – to add further dimension. Consider adding small embellishments like faux berries, pinecones, tiny bells, or a beautiful bow made from coordinating ribbon. You could even integrate small LED fairy lights for an extra magical glow. This project is a fantastic canvas for expressing your unique style and matching your existing holiday decor seamlessly. Don’t be afraid to experiment with colors and accents that truly speak to your festive vision.
Why DIY? The Joy of Handmade Holiday Decor
Beyond the undeniable cost savings, there’s an immense joy and personal satisfaction that comes from creating your own holiday decorations. A handmade wreath isn’t just a decoration; it’s a reflection of your personality, your effort, and your festive spirit. It brings a unique, heartwarming touch to your home that store-bought items simply can’t replicate. It’s a conversation starter, a treasured piece that holds memories of its creation, and a source of pride every time you look at it. Furthermore, crafting can be a wonderfully relaxing and meditative activity, offering a delightful escape from the holiday rush. It’s a thoughtful way to add warmth and character to your home, making it feel truly special and inviting for family and friends during the most wonderful time of the year. Consider making one as a heartfelt, personalized gift for a loved one!
I hope this detailed guide inspires you to try making your own vintage-inspired ornament wreath. It’s a project that truly delivers on its promise of beauty, affordability, and immense satisfaction. Happy crafting!