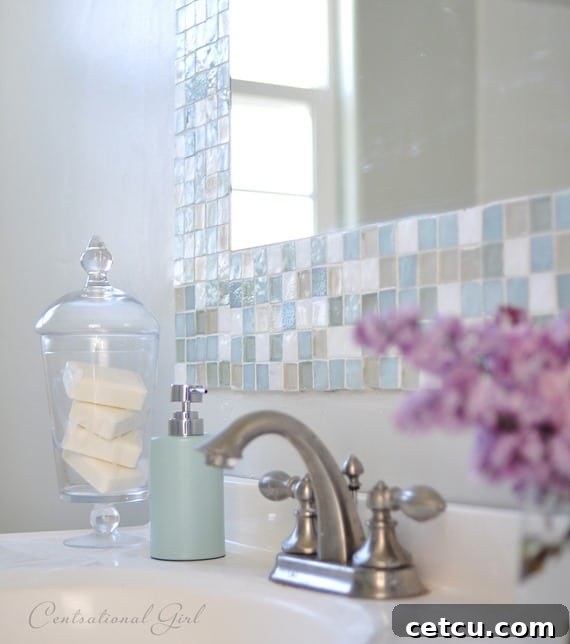
Make your home fabulous, for less, with a DIY Mosaic Tile Bathroom Mirror.
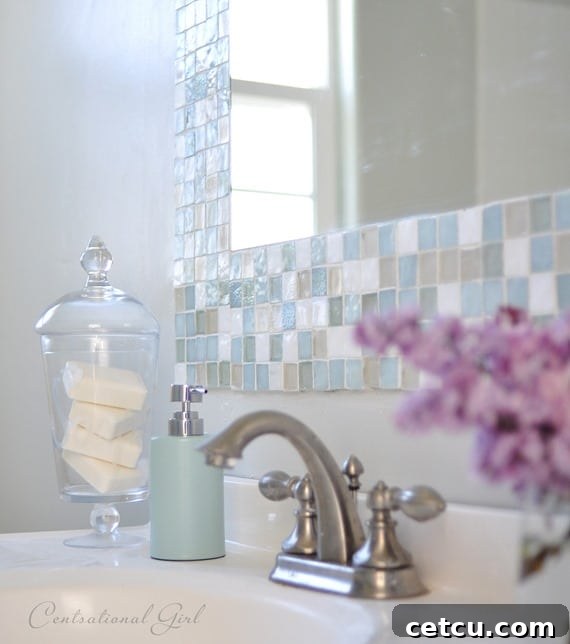
image source: centsational girl
Transform Your Bathroom with a Stunning DIY Mosaic Tile Mirror
Are you envisioning a bathroom refresh that radiates personality and elegance, all without breaking the bank? The secret lies in embracing the rewarding world of DIY, and among the myriad of projects, crafting your own mosaic tile bathroom mirror stands out for its exceptional visual impact and creative satisfaction. Imagine a bespoke centerpiece, carefully curated by your own hands, that not only illuminates your space but also reflects your unique style and craftsmanship. This comprehensive guide will equip you with all the knowledge and steps required to create a truly fabulous mosaic mirror, transforming your ordinary bathroom into an extraordinary sanctuary.
The Allure of DIY: Why a Mosaic Tile Bathroom Mirror?
In an era dominated by mass-produced decor, a handmade mosaic mirror emerges as a distinctive statement piece. Beyond its captivating aesthetic, there are compelling reasons why embarking on this DIY journey is an incredibly worthwhile endeavor:
Unleash Personal Style and Unique Flair
Unlike standard off-the-shelf mirrors, a mosaic mirror offers boundless opportunities for personalization. You become the artisan, hand-picking every tile, every hue, and every pattern to precisely match your individual taste. Whether your vision leans towards a lively, eclectic arrangement or a tranquil, monochromatic masterpiece, mosaic tiling empowers you to materialize your specific design aspirations. This profound level of customization ensures your bathroom feels authentically yours – a private retreat meticulously tailored to your preferences, making it truly a one-of-a-kind space.
Achieve High-End Elegance on a Budget
Commissioning a custom-designed mirror from professional artisans often involves a substantial financial investment. By opting for the DIY route, you can attain that coveted high-end, custom look for a mere fraction of the cost. Your primary expenses will typically include the mirror itself, your selected mosaic tiles, and a few fundamental tiling supplies. This budget-conscious approach democratizes luxurious bathroom upgrades, making them accessible to everyone and allowing you to allocate your savings to other cherished items or home improvements.
Experience the Deep Satisfaction of Creation
There is an immense sense of accomplishment and pride that comes from creating something beautiful with your own hands. Completing a DIY mosaic mirror project not only beautifies your home but also bolsters your confidence, serving as a tangible testament to your creative abilities. It’s a craft that is surprisingly accessible, even for novices, yet yields breathtaking results that often appear far more intricate than the actual process entails. The joy of telling guests, “I made that!” is truly priceless.
Visually Enhance Any Bathroom Space
A mosaic mirror instantly elevates the visual appeal of any bathroom, regardless of its size or existing decor. The intricate patterns and often shimmering textures of mosaic tiles expertly capture and refract light, introducing depth, dimension, and an artistic touch to the room. It naturally becomes a focal point, drawing the eye and imparting a more sophisticated and deliberately designed ambiance. When strategically placed, particularly above a vanity or sink, it can effectively make a smaller bathroom appear more spacious and brighter, creating an illusion of grandeur.
Igniting Inspiration: Designing Your Dream Mosaic Mirror
The inherent beauty of mosaic lies in its incredible versatility. Before you gather your materials, dedicate some time to exploring diverse styles and pinpointing a design that truly resonates with you. The initial inspiration, such as the exquisite project featured on Centsational Girl, perfectly illustrates how a DIY tile mirror can be an absolutely stunning focal point, proving that a “WOW” custom piece is within reach without a hefty expenditure. Here are several design avenues to spark your imagination:
Exploring Tile Types and Textures
- Ceramic and Porcelain Tiles: These are widely available, cost-effective, and come in an astonishing array of colors, sizes, and finishes. They are ideal for achieving a classic, timeless aesthetic or contemporary designs.
- Glass Tiles: Renowned for their beautiful translucence and radiant shimmer, glass tiles are perfect for infusing sparkle and visual depth into your design. They brilliantly reflect light and are available in countless colors and various sizes.
- Stone Tiles: Opt for stone tiles like tumbled marble, river stones, or slate to cultivate a natural, earthy, and rustic feel, lending an organic aesthetic to your bathroom.
- Mirror Shards: For an intensely reflective and glamorous effect, carefully consider using pieces of old mirrors. Remember to handle these with extreme caution, always wearing robust protective gear.
- Mixed Media: Do not restrict yourself to a single material! Creatively combine different elements such as glass and ceramic, or even embed small decorative items like beads, polished pebbles, or seashells for a truly distinctive and artistic creation.
Cultivating Color Palettes and Patterns
- Monochromatic Mastery: Employing various shades and tones of a single color can yield a sophisticated, understated elegance that is both modern and calming.
- Vibrant & Eclectic Blends: Fearlessly combine bold, contrasting colors to forge a playful and energetic look, perfect for injecting a lively pop of color into a neutral bathroom scheme.
- Geometric Precision: Craft intricate, structured patterns using square, rectangular, or triangular tiles for a sleek, contemporary, and organized design.
- Organic Flow and Abstraction: Arrange irregularly shaped tiles or carefully broken pieces to form fluid, abstract designs that beautifully mimic natural forms and movements.
- Subtle Ombre Transitions: Create a gentle and soothing visual effect by gradually transitioning from one color shade to another, adding a sophisticated gradient to your mirror.
The Impact of Grout Color
The color of the grout you select is a pivotal element in the final appearance of your mosaic. A contrasting grout color can dramatically make your tiles stand out and accentuate the intricate pattern, while a complementary or matching grout color can create a more cohesive, subtle, and seamless visual flow. Darker grout options can effectively conceal minor imperfections and often impart an antique or dramatic feel, whereas lighter grout hues tend to brighten the overall design, making it feel fresh and expansive.
Essential Preparations: Gathering Your Supplies
Before you commence the tiling process, ensure that you have all the necessary materials and tools readily accessible. Meticulous planning and preparation will guarantee a smooth, efficient, and ultimately enjoyable project experience.
Key Materials for Your Mosaic Project:
- The Mirror Base: Choose a frameless mirror or an existing framed mirror you wish to upcycle. Carefully consider the ideal size and shape that will best complement your bathroom wall and design vision.
- Mosaic Tiles: Select your preferred tile type, colors, and quantity. Accurately calculate the surface area you intend to cover and add an extra 10-15% to account for necessary cuts, potential breakages, and design adjustments.
- Tile Adhesive: A robust, waterproof adhesive specifically formulated for mosaics is crucial. Excellent options include thin-set mortar (ideal for heavier tiles), mastic, or a high-quality silicone-based construction adhesive. Always verify that the adhesive is rated for bathroom use to withstand consistent humidity and moisture.
- Grout: Opt for sanded grout if your tile gaps are wider (typically 1/8 inch or more) and unsanded grout for narrower gaps. Choose a grout color that beautifully enhances or subtly complements your chosen tile design.
- Grout Sealer: (Highly recommended but optional) Applying a grout sealer is vital for protecting the grout lines from moisture penetration, unsightly stains, and the growth of mildew, particularly important in a humid bathroom environment.
- Protective Sheeting/Drop Cloth: Essential for covering your workspace and surrounding surfaces, safeguarding them from potential spills of adhesive and grout.
Indispensable Tools for the Craft:
- Safety Glasses and Gloves: Absolute necessities for protecting your eyes from tile shards and your hands from contact with adhesives and grout, which can be irritating.
- Pencil and Ruler/Tape Measure: For precise planning of your layout, marking guide lines on the mirror, and ensuring symmetrical design.
- Level: Crucial for ensuring that your mirror is perfectly horizontal or vertical and that your initial tile lines are straight and even.
- Tile Nippers/Cutters: Required if you plan to cut your tiles into specific shapes or smaller fragments. A specialized scoring tool may also be beneficial for cutting glass tiles cleanly.
- Trowel or Spreader: Used for applying tile adhesive uniformly. For smaller, more intricate areas, a small spatula or even a sturdy popsicle stick can be surprisingly effective.
- Grout Float: A rubber-faced tool designed to press grout firmly and evenly into the gaps between your tiles, ensuring full coverage.
- Sponges and Buckets: Keep multiple clean sponges and at least two buckets (one for initial rinsing of the sponge, the other for fresh, clean water) readily available for efficiently cleaning up excess grout.
- Clean Cloths: For the final buffing and polishing of your tiles, removing any residual haze.
The Creation Process: Step-by-Step Guide to Your Mosaic Masterpiece
With all your supplies meticulously gathered, it’s time to transform your creative vision into a tangible reality. This project is often achievable within a single weekend, with drying and curing times typically being the most significant factor.
Step 1: Prepare Your Workspace and Mirror Surface
Begin by laying down protective sheeting or a drop cloth to shield your work area from adhesive and grout spills. If you are refurbishing an existing framed mirror, you might consider carefully removing the old frame if your design involves tiling directly onto the mirror’s edge, or thoroughly clean and prepare the frame itself if you plan to tile over it. Ensure the mirror’s surface is impeccably clean, completely dry, and devoid of any dust, grime, or grease. For optimal adhesion on some mirror backings or frame materials, a light sanding with fine-grit sandpaper might be beneficial.
Step 2: Methodically Plan Your Tile Layout
This phase is absolutely critical! Before applying any adhesive, arrange your mosaic tiles around the mirror’s edge or on a separate piece of paper or cardboard to visualize your complete design. Experiment with various patterns, tile spacing, and color combinations. If aiming for a precise border width or a specific repeating pattern, use a pencil to lightly mark guide lines directly on the mirror. This “dry run” not only helps prevent costly mistakes but also ensures you are fully satisfied with the intended final aesthetic.
Step 3: Carefully Apply Tile Adhesive
Work in small, manageable sections (for instance, tackling one side or corner of the mirror at a time). Apply a thin, consistent layer of your chosen tile adhesive to the mirror surface where your mosaic will be placed. Utilize a notched trowel or spreader to achieve even coverage, or a smaller tool for greater precision in intricate areas. Exercise caution to avoid applying an excessive amount of adhesive, as this can easily squeeze up between the tiles, making the subsequent cleanup process considerably more challenging.
Step 4: Precisely Place Your Mosaic Tiles
With meticulous care, position your tiles onto the adhesive, diligently adhering to your pre-planned layout. Press each tile firmly into the adhesive to establish excellent contact. Strive to maintain uniform spacing between individual tiles; if desired, insert tile spacers at this stage. Should you need to cut tiles, employ your tile nippers or cutters, always remembering to wear your safety glasses. Proceed methodically, section by section, until all your mosaic tiles are securely in position.
Step 5: Allow the Adhesive to Thoroughly Cure
This step is paramount for the enduring integrity and longevity of your mosaic. Refer explicitly to your chosen adhesive’s instructions for the recommended drying time, which typically ranges from 24 to 48 hours, or even longer in humid conditions. Do not under any circumstances rush this crucial process! The adhesive must be completely dry and fully set before you advance to the next stage, especially given the inherent humidity of a bathroom environment.
Step 6: Expertly Grout the Tiles
Once the adhesive is confirmed to be entirely dry, it’s time to apply the grout. Mix your selected grout powder with water precisely according to the manufacturer’s directions, aiming for a consistency similar to thick peanut butter. Using a rubber grout float, spread the grout over the entire tiled surface, pressing it firmly and deeply into all the gaps and crevices between the tiles. Work in a diagonal motion across the tiles to guarantee comprehensive coverage and to effectively remove excess grout from the tile faces.
Step 7: Diligently Clean Off Excess Grout
After approximately 15-30 minutes (or as advised by the grout manufacturer, as the grout begins to firm up but is not yet fully dry), use a damp (not oversaturated) sponge to gently wipe away any surplus grout from the tile surfaces. Rinse your sponge frequently in a bucket of clean water, changing the water as it becomes cloudy. Be cautious not to inadvertently pull grout out from the freshly filled lines. You may need to perform several passes with a clean, damp sponge until the tile surfaces are completely clean. Allow the grout to dry and cure for an additional 24-48 hours.
Step 8: Final Clean and Polishing
Once the grout has thoroughly cured, you might observe a thin, dull film or haze on your tiles. This is commonly known as grout haze. Utilize a clean, dry microfiber cloth or a specialized grout haze remover (following its instructions carefully) to gently buff the tiles until they gleam and sparkle. Your mosaic mirror is now nearing its grand reveal!
Step 9: Apply Grout Sealer (Highly Recommended)
For an enhanced layer of protection against moisture, potential mildew growth, and stubborn stains—an absolute must in a bathroom setting—apply a high-quality grout sealer. Adhere strictly to the product’s application instructions. This vital step significantly helps to extend the life and preserve the pristine beauty of your mosaic for years to come.
Step 10: Securely Install Your Gorgeous Mirror
With every component dry and sealed, the moment has arrived to proudly hang your magnificent new mosaic mirror! Employ appropriate wall anchors and sturdy hanging hardware that are specifically rated for the substantial weight of your finished mirror. Ensure it is securely fastened to the wall, especially if it is a large and heavy piece. Position it strategically, perhaps as the crowning glory above your vanity or as an independent decorative art piece, to maximize its breathtaking visual impact.
Advanced Tips for Success and Enduring Beauty
- Embrace Simplicity Initially: If you are new to the art of mosaics, it’s wise to commence with a simpler pattern and larger, more forgiving tiles before tackling intricate designs.
- Prioritize Safety: Always wear robust safety glasses when cutting tiles and protective gloves when handling any adhesives, grout, or chemicals.
- Respect Drying Times: Strict adherence to the manufacturer’s recommended drying and curing times for both adhesive and grout is absolutely paramount for the long-term durability and structural integrity of your mosaic.
- Practice Makes Perfect: If you feel apprehensive about cutting tiles, dedicate some time to practice on a few spare pieces to develop confidence and proficiency.
- Clean Proactively: Promptly wipe away any adhesive drips or excess grout as you work to prevent them from drying and becoming significantly harder to remove later.
Caring for Your Bespoke Mosaic Mirror
Maintaining the pristine condition of your DIY mosaic mirror is straightforward and requires minimal effort. Clean the tiled and grouted surfaces with a mild, pH-neutral, non-abrasive cleaner and a soft cloth or sponge. Avoid using harsh chemical cleaners, abrasive scrubbers, or acidic solutions, as these can potentially damage the grout, the tile finish, or the mirror backing. If you’ve applied a grout sealer, plan to re-apply it every 1-2 years, or as explicitly recommended by the sealer manufacturer, to ensure continuous, optimal protection against moisture and stains in your busy bathroom.
Embark on Your Creative DIY Journey!
Creating a DIY mosaic tile bathroom mirror transcends a mere home improvement task; it represents a wonderful opportunity to imbue your living space with unparalleled personality, achieve significant cost savings, and revel in the profound satisfaction of crafting something truly beautiful and enduring. As I personally prepare for the exciting prospect of moving to a new home, I find myself continually drawn to inspiring DIY projects such as this one, recognizing their immense potential to transform an unfamiliar space into a warm, inviting, and truly personalized home. This particular idea has certainly earned its prime spot on my Decorating Our Home Pinterest board!
The aesthetic transformation your bathroom will experience with this custom, handcrafted piece is nothing short of remarkable. It is an accessible project that promises substantial artistic returns, enabling you to effortlessly achieve that coveted “designer look” without the accompanying premium price tag. So, gather your materials, confidently unleash your inner artist, and prepare to create a stunning focal point that will undoubtedly dazzle and inspire for many years to come.
I’m Lovin’…….DIY Mosaic Tile Bathroom Mirror
Have you ever ventured into creating something beautiful with mosaic tiles, or does this project spark an immediate desire to try it yourself?
We’d love to hear your thoughts, experiences, and any creative ideas you might have. Share them in the comments section below! What DIY projects or home decor inspirations are you “lovin'” this week?
*Don’t forget to check back for more exciting DIY ideas and home decor inspiration to spark your next project!