
Discovering the wonderful world of royal icing and cookie decorating has truly transformed my kitchen into a vibrant hub of creativity and delicious aromas! Ever since Bridget of Bake at 350 first introduced me to the magic of this intricate art form, I’ve been utterly obsessed – a true cookie baking and decorating enthusiast! Bridget’s blog is an absolute treasure trove, brimming with ingenious ideas, practical tips, and endless inspiration for anyone looking to master the delicate craft of cookie artistry. Her clear instructions and beautiful designs have made this once daunting hobby accessible and incredibly rewarding.
My journey into cookie decorating started with a familiar favorite. For years, my girls have adored the cheerful smiley face cookies from a beloved local bakery, about a half-hour drive from our home. The joy these simple, bright cookies brought them was infectious, and it quickly became our go-to design. We’ve been pretty much sticking with the classic smiley face cookie, sharing them with everyone we know – friends, family, neighbors, and even distant relatives have been delighted by these sweet, edible smiles! It’s amazing how a simple cookie can spread so much happiness and connect people.
Through countless batches and a bit of trial and error, I’ve gathered a few invaluable tips that have significantly improved my cookie baking and decorating game. While I can’t pinpoint the exact origin of every single piece of advice – though, knowing my reliance on her expertise, most likely they came from Bridget herself – I am eager to share these insights with fellow baking enthusiasts. Bridget has been incredibly generous with her knowledge, patiently answering all of my sometimes-crazy emails filled with beginner’s questions, always guiding me toward better results. Her mentorship has been an essential part of my progress, turning what could have been frustrating attempts into satisfying successes.
Achieving perfectly uniform cookies is often the first step towards professional-looking decorated treats. Unevenly rolled dough can lead to some cookies burning while others remain undercooked, and it certainly makes decorating a challenge. Over time, I’ve discovered a brilliant method for rolling out cookie dough that ensures every single cookie is the same thickness, leading to consistent baking and a beautifully uniform appearance. This simple trick has elevated my cookie game considerably and is easily one of my favorite baking hacks.
Mastering the Art of Rolling Out Cookie Dough: Achieving Perfect Thickness Every Time
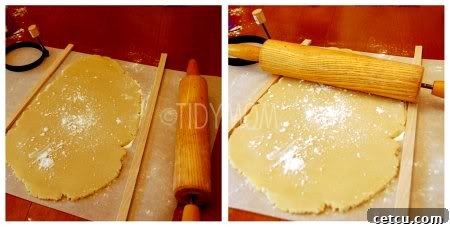
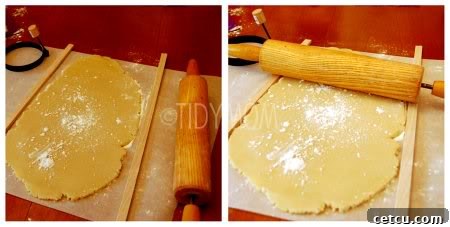
1. One of the most common challenges in cookie baking is achieving a consistent dough thickness. This consistency is paramount for even baking, preventing some cookies from burning while others are still raw, and ensuring a uniform look for decorating. To get all of my cookies the same size and thickness, I invested in a simple yet incredibly effective tool: a balsa stick 1/4″ thick. I found mine at JoAnn’s, a popular craft store, and simply broke it in half to create two even guides. As I roll out my dough, I lay one balsa stick along each side of my dough. This technique ensures that no matter how much pressure I apply with the rolling pin, the dough will never be thinner than the height of the balsa sticks. It creates a perfectly level surface, resulting in uniformly thick cookie dough every single time. This is a game-changer for anyone aiming for professional-looking, perfectly baked cookies. The balsa wood is lightweight and inexpensive, making it an accessible tool for home bakers. If balsa wood isn’t readily available, you can also use thin wooden dowels, rulers, or even stacks of cardboard cut to the desired thickness. The key is to have two identical guides on either side of your dough to control the rolling pin’s height. This trick not only guarantees consistent baking results but also makes the subsequent decorating process much easier, as all your cookie canvases will be the same size and height.
2. Another fantastic tip that has significantly improved the texture and flavor of my cookies involves what I use to “flour” my rolling pin and dough. Traditionally, bakers reach for all-purpose flour to prevent sticking. However, I’ve learned that using powdered sugar instead of flour to “flour” your rolling pin and dough is a superior method. The difference is subtle yet impactful. Regular flour can tend to dry out the dough slightly, especially if you use a bit too much, and it can leave a somewhat dusty, non-sweet residue on your cookies. Powdered sugar, on the other hand, just adds an extra touch of sweetness without the risk of drying out the dough. It melts seamlessly into the cookie during baking, contributing to a wonderfully tender texture and an even more delightful flavor profile. This method ensures your cookies remain moist and delicious, without any residual flour taste or appearance. It’s a simple swap that yields noticeable improvements in both taste and texture, giving your cookies that extra professional touch. Plus, the light dusting of powdered sugar makes the rolling process incredibly smooth, preventing any sticking without altering the delicate balance of your cookie dough recipe. This tip is especially beneficial for sugar cookies or any rolled cookie where you want to maintain maximum tenderness and sweetness.
Oh, and one last tip that is absolutely crucial, especially for those eager to showcase their beautiful creations online or in person:
Always let your royal icing dry thoroughly, preferably several hours, before attempting to move them, stack them, or take pictures! This might seem like a small detail, but it makes all the difference in preserving the pristine beauty of your decorated cookies. Impatience can lead to smudged designs, cracked icing, or even ruined cookies. Royal icing, with its hard, protective shell, requires significant time to set completely. Bridget, my royal icing guru, recommends a minimum of 24 hours for it to dry completely. This full drying time is essential not just for aesthetic reasons but also for practical ones, such as packaging and shipping.
Understanding the drying process of royal icing is key to successful cookie decorating. Royal icing dries through evaporation, meaning the water content needs to fully escape for the sugar to crystalize and harden into a durable shell. If you rush this process, the icing might feel dry to the touch on the surface but can still be soft underneath. This can lead to a host of problems. Imagine spending hours meticulously decorating a batch of cookies, only for the delicate details to smudge when you try to arrange them for a photo shoot, or worse, when you stack them for storage. Smudged icing is disheartening and can diminish the perceived quality of your hard work. Moreover, if the icing isn’t fully dry, it won’t hold up well during transport or in humid conditions, potentially leading to stickiness or even meltdowns.
Factors like humidity and temperature can influence drying times. In a humid environment, royal icing will naturally take longer to dry. Conversely, a drier, warmer room can speed up the process. Some decorators use a dehydrator or a fan on a low setting to gently circulate air and reduce drying time, but direct, strong airflow can sometimes cause craters or dull spots. The best practice is to allow your cookies to air dry at room temperature, ideally in a cool, dry place away from direct sunlight and excessive humidity. Placing them on a cooling rack allows air to circulate around all sides, aiding in quicker and more even drying.
When Bridget advises 24 hours for complete drying, she’s emphasizing the importance of patience. This extended period ensures that even the thickest layers of icing, or complex 3D designs, are fully hardened through and through. For thinner details or flood icing, you might find it’s surface dry in a few hours, but to be truly set for handling, stacking, or packaging, especially in airtight containers, that full day is crucial. A fully dry cookie will have a hard, non-tacky surface that won’t smear or indent when gently pressed. The colors will be vibrant, and the sheen will be consistent. So, resist the urge to handle your beautifully decorated cookies too soon. Plan ahead, allow ample drying time, and you’ll be rewarded with durable, flawless masterpieces that are truly ready for their close-up or to be shared with loved ones. Happy decorating!